Sometimes working In Photoshop is very hard, but it is not how It is supposed to be. There are many ways to do thing faster and quicker in photoshop. And once you know the tools, you will love photoshop. In today’s topic I am going to discuss how to center text in photoshop. This is very simple and I will explain this step by step with images, so you can understand photoshop alignment better.
Here in the first image you will see the blank page with three text layers. These are the dummy text to explain.
One layer is for the background. Which is locked. And we will keep it locked.

PROBLEM WITH CENTER TEXT IN PHOTOSHOP
Now here we see if we click on one layer to center it, we don’t get any option for that, even though we can see the top where there are options for alignment but they are unavailable.
SOLUTION
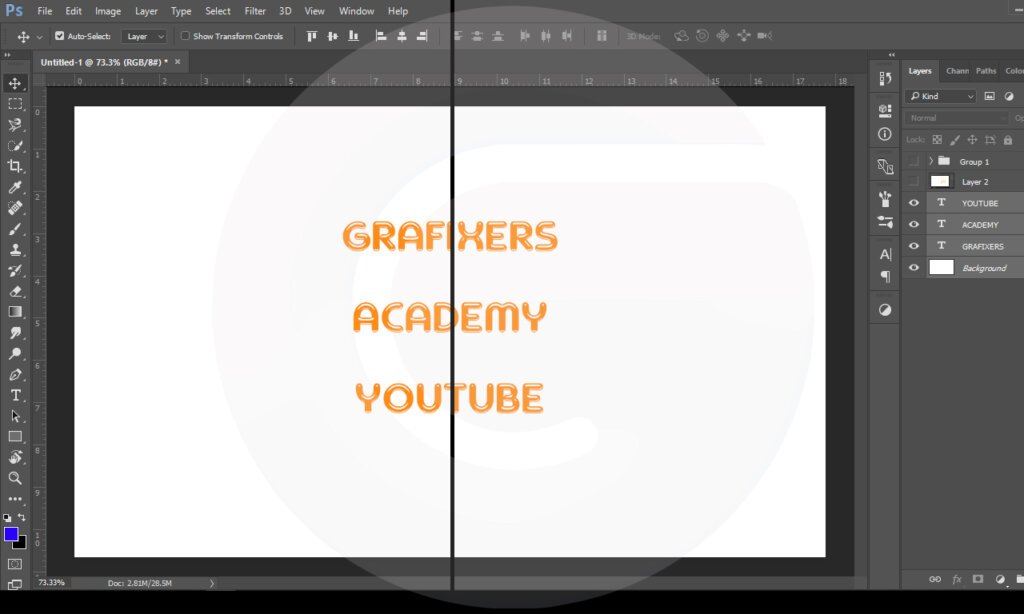
Now the trick is here, all you need to do it to select 2 layers at least. If you select 2 layers then you will see half of the options at the top. Make sure that you have the move tool selected. As you can see in the image below.

Now if you click on the center align that is 5th option on the top, the two text will align themselves accordingly. But the issue is you don’t get the text right in the middle of the page. As shown in the picture below.
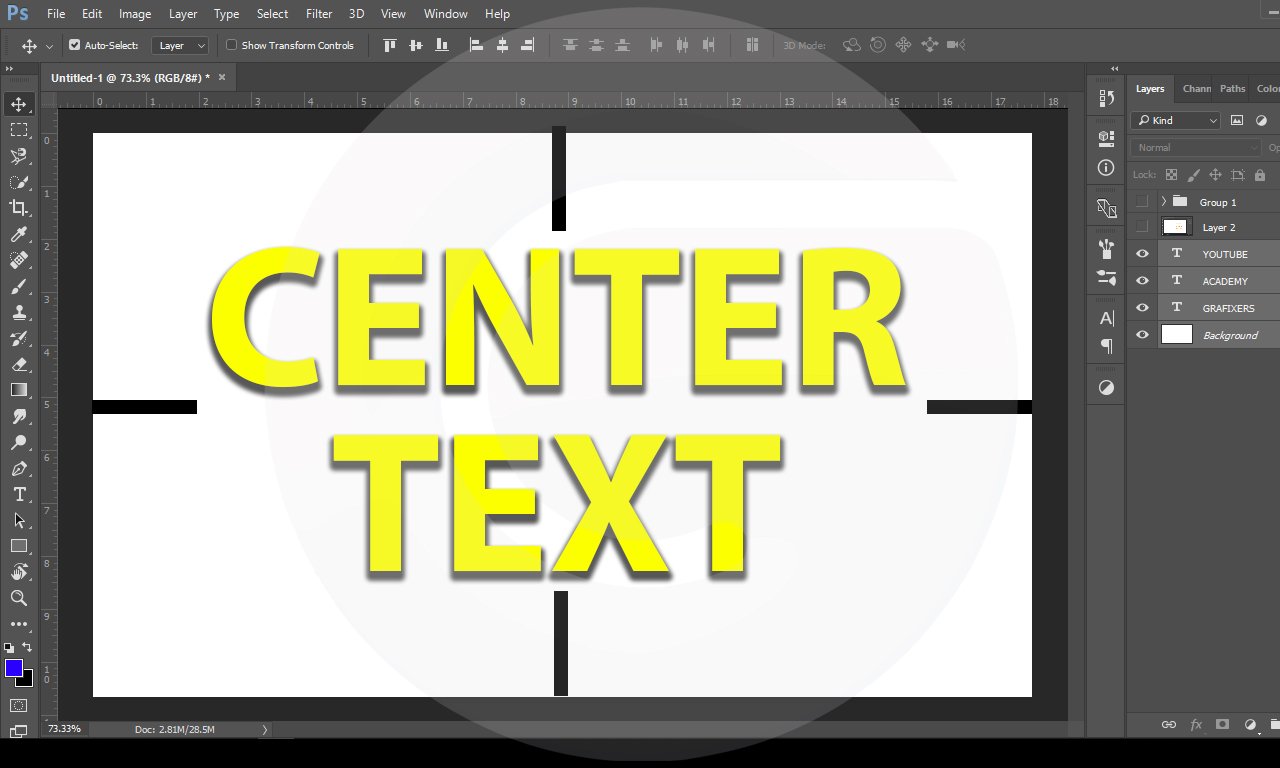
So what is the proper way to make them center on the page, so to do so, rather than selecting the two layers, just select the background layer that is locked, so this layer will not move anywhere.
As shown in the image below, I have selected the background layer, and then I will do the same procedure, and click on the 5th icon at the top for centering them on the page. Now this will make the text center and for reference I have drawn a line.
This is how you can make anything center in photoshop. Without any hassle, just in 2 clicks.
Here is my response:
Photoshop is a powerful and versatile software that allows you to create stunning graphics, edit photos, design logos, and more. One of the basic skills you need to learn in Photoshop is how to center text in different ways. In this article, I will show you how to center text horizontally, vertically, and on a portion of the canvas using various methods and tools. I will also provide some tips and tricks to make your text look more professional and appealing.
How to Center Text Horizontally in Photoshop
Horizontal centering means aligning the text evenly between the left and right margins of the canvas. This is useful when you want to create a title, a headline, or a logo that stands out in the middle of the page. There are two main ways to center text horizontally in Photoshop: using the Move tool or using guides and snapping.
Using the Move Tool
The Move tool is the simplest and fastest way to center text horizontally in Photoshop. Here are the steps to follow:
Your text is now centered horizontally on the canvas. You can adjust its position by clicking and dragging it with the Move tool. You can also use the arrow keys to move it by small increments.
Using Guides and Snapping
Another way to center text horizontally in Photoshop is to use guides and snapping. Guides are non-printable lines that help you align elements on your canvas. Snapping is a feature that makes your elements snap to the nearest guide, grid line, or edge when you move them. Here are the steps to follow:
- Write your text using the Text tool (T). You can choose any font, size, color, and style you want.
- Go to View > Rulers or press Ctrl+R (Windows) or Command+R (Mac) to show the rulers on the top and left sides of your canvas.
- Click on the top ruler and drag it down to create a horizontal guide. Release it when it reaches the center of your canvas. You will see a tooltip that says “Center” when you are at the exact middle point.
- Select the Move tool (V) from the toolbar or press V on your keyboard. This will put a bounding box around your text layer.
- Go to View > Snap or press Ctrl+Shift+; (Windows) or Command+Shift+; (Mac) to enable snapping. Make sure that Snap To > Guides is checked in the View menu.
- Click and drag your text layer until it snaps to the horizontal guide. You will see a purple line indicating that your text is aligned with the guide.
- Delete or hide the guide by dragging it back to the ruler or by going to View > Clear Guides.
Your text is now centered horizontally on the canvas. You can adjust its position by clicking and dragging it with the Move tool. You can also use the arrow keys to move it by small increments.
How to Center Text Vertically in Photoshop
Vertical centering means aligning the text evenly between the top and bottom margins of the canvas. This is useful when you want to create a poster, a flyer, or a banner that has text in the middle of the page. There are two main ways to center text vertically in Photoshop: using padding or using line-height.
Using Padding
One way to center text vertically in Photoshop is to use padding. Padding is the space between the edge of an element and its content. By adding equal padding on the top and bottom of your text layer, you can create a balanced vertical alignment. Here are the steps to follow:
- Write your text using the Text tool (T). You can choose any font, size, color, and style you want.
- Select the Move tool (V) from the toolbar or press V on your keyboard. This will put a bounding box around your text layer.
- On the Options bar at the top of the screen, click the link icon next to W and H fields. This will lock the width and height of your text layer so that they don’t change when you add padding.
- In the W field, enter the width of your canvas in pixels. For example, if your canvas is 800 pixels wide, enter 800.
- In the H field, enter the height of your canvas in pixels. For example, if your canvas is 600 pixels high, enter 600.
- Press Enter or Return to apply the changes. Your text layer will now have the same dimensions as your canvas, but the text will remain in its original position.
- On the Options bar, click the Align Vertical Centers button. This is the third button from the left in the Align section. It looks like two squares with a horizontal line through the center. This will align the center of your text layer with the center of the canvas.
Your text is now centered vertically on the canvas. You can adjust its position by clicking and dragging it with the Move tool. You can also use the arrow keys to move it by small increments.
Using Line-Height
Another way to center text vertically in Photoshop is to use line-height. Line-height is the distance between two lines of text, measured from baseline to baseline. Baseline is the imaginary line on which most letters sit. By setting the line-height equal to the height of your canvas, you can create a perfect vertical alignment. Here are the steps to follow:
- Write your text using the Text tool (T). You can choose any font, size, color, and style you want.
- Select the Move tool (V) from the toolbar or press V on your keyboard. This will put a bounding box around your text layer.
- On the Options bar at the top of the screen, click the link icon next to W and H fields. This will lock the width and height of your text layer so that they don’t change when you adjust the line-height.
- On the Options bar, click the Character panel icon. This is the icon that looks like a capital A next to a lowercase a. This will open a panel where you can change various text properties.
- In the Character panel, find the field that shows A with two arrows pointing up and down. This is the line-height field. Enter the height of your canvas in pixels. For example, if your canvas is 600 pixels high, enter 600.
- Press Enter or Return to apply the changes. Your text layer will now have a line-height equal to the height of your canvas, but the text will remain in its original position.
- On the Options bar, click the Align Vertical Centers button. This is the third button from the left in the Align section. It looks like two squares with a horizontal line through the center. This will align the center of your text layer with the center of the canvas.
Your text is now centered vertically on the canvas. You can adjust its position by clicking and dragging it with the Move tool. You can also use the arrow keys to move it by small increments.
How to Center Text on a Portion of the Canvas in Photoshop
Sometimes you may want to center text on a specific area of your canvas, rather than on the whole page. For example, you may want to create a collage or a card with other text and images around your main text. In this case, you can use a simple trick to center text on a portion of the canvas using selection and alignment tools. Here are the steps to follow:
- Write your text using the Text tool (T). You can choose any font, size, color, and style you want.
- Select the Rectangular Marquee tool (M) from the toolbar or press M on your keyboard. This will allow you to create a rectangular selection on your canvas.
- Click and drag on your canvas to create a selection that covers the area where you want to center your text. You can adjust the size and position of your selection by holding Shift or Alt (Windows) or Option (Mac) while dragging.
- Select the Move tool (V) from the toolbar or press V on your keyboard. This will put a bounding box around your text layer.
- On the Options bar at the top of the screen, click the Align Horizontal Centers button and then click the Align Vertical Centers button. These are the second and third buttons from the left in the Align section. They look like two squares with vertical and horizontal lines through them respectively. These will align the center of your text layer with the center of your selection.
- Press Ctrl+D (Windows) or Command+D (Mac) to deselect the selection.
Your text is now centered on a portion of the canvas that you specified. You can adjust its position by clicking and dragging it with the Move tool. You can also use the arrow keys to move it by small increments.
Tips and Tricks for Centering Text in Photoshop
- Here are some additional tips and tricks that can help you center text in Photoshop more easily and effectively:
- You can use keyboard shortcuts to access the alignment tools quickly. For example, you can press Ctrl+Shift+C (Windows) or Command+Shift+C (Mac) to align horizontal centers, and Ctrl+Shift+M (Windows) or Command+Shift+M (Mac) to align vertical centers.
- You can use smart guides to help you align text with other elements on your canvas. Smart guides are thin blue lines that appear when you move or transform an element near another element. They show you the alignment, distance, and angle between the elements. To enable smart guides, go to View > Show > Smart Guides or press Ctrl+U (Windows) or Command+U (Mac).
- You can use the Paragraph panel to change the alignment and justification of your text. The Paragraph panel is similar to the Character panel, but it has more options for text formatting. You can access it by clicking the Paragraph panel icon on the Options bar or by going to Window > Paragraph. In the Paragraph panel, you can choose from four alignment options: left, center, right, and justify. You can also adjust the indentation, spacing, and hyphenation of your text.
- You can use layer styles to add effects and enhancements to your text. Layer styles are presets that apply various attributes such as shadows, strokes, gradients, and patterns to your text layer. You can access them by clicking the Layer Style icon at the bottom of the Layers panel or by going to Layer > Layer Style. In the Layer Style dialog box, you can choose from various styles and customize their settings. You can also save your own styles and apply them to other text layers.
I hope this article has helped you learn how to center text in Photoshop in different ways. If you have any questions or feedback, please feel free to leave a comment below. Thank you for reading and happy designing! 😊
CONCLUSION
1-The main point is to select at least 2 layers.
2-select one layer that is already centered and make sure that layer is locked.
I hope you like the article and it was beneficial for you.
The next topic is about “how to lock and unlock a layer in photoshop”
FAQs
How to center text in Photoshop using move tool
You can select the move tool in Photoshop by clicking on the icon that looks like a cross with four arrows on the toolbar or by pressing V on your keyboard.
You can select the entire canvas in Photoshop by pressing Ctrl+A (Windows) on your keyboard. You will see a dotted line around the edges of the canvas indicating the selection.
You can select the entire canvas in Photoshop by pressing Command+A (Mac) on your keyboard. You will see a dotted line around the edges of the canvas indicating the selection.
You can align horizontal centers in Photoshop by clicking on the button that looks like two squares with a vertical line through the center on the Options bar at the top of the screen. This is the second button from the left in the Align section. This will align the center of your text layer with the center of the canvas.
You can create a horizontal guide in Photoshop by clicking on the top ruler and dragging it down to create a horizontal line on your canvas. You can release it when it reaches the center of your canvas. You will see a tooltip that says “Center” when you are at the exact middle point.
You can enable snapping in Photoshop by going to View > Snap or by pressing Ctrl+Shift+; (Windows) on your keyboard. Make sure that Snap To > Guides is checked in the View menu.
You can enable snapping in Photoshop by going to View > Snap or by pressing Command+Shift+; (Mac) on your keyboard. Make sure that Snap To > Guides is checked in the View menu.
You can snap your text layer to the horizontal guide in Photoshop by selecting the move tool and clicking and dragging your text layer until it snaps to the horizontal guide. You will see a purple line indicating that your text is aligned with the guide.
You can create a rectangular selection in Photoshop by selecting the Rectangular Marquee tool from the toolbar or by pressing M on your keyboard. This will allow you to create a rectangular selection on your canvas by clicking and dragging.
You can adjust the size and position of your selection in Photoshop by holding Shift or Alt (Windows) while dragging. Holding Shift will constrain the proportions of your selection, while holding Alt or Option will resize your selection from its center.
You can adjust the size and position of your selection in Photoshop by holding Option (Mac) while dragging. Holding Shift will constrain the proportions of your selection, while holding Alt or Option will resize your selection from its center.
How to center text using padding or line-height in PhotoshopPadding is the space between the edge of an element and its content. For example, if you have a text layer with a width of 200 pixels and a height of 100 pixels, and you add 50 pixels of padding on each side, your text layer will have a width of 300 pixels and a height of 200 pixels, but the text will remain in its original position.
Line-height is the distance between two lines of text, measured from baseline to baseline. Baseline is the imaginary line on which most letters sit. For example, if you have a text layer with a font size of 24 pixels and a line-height of 36 pixels, there will be 12 pixels of space between each line of text.
You can change the padding or line-height of your text layer in Photoshop by using the Options bar or the Character panel. On the Options bar, you can enter the width and height of your text layer in the W and H fields, and click the link icon next to them to lock them. This will add padding to your text layer. On the Character panel, you can enter the line-height of your text layer in the field that shows A with two arrows pointing up and down. This will adjust the line-height of your text layer.
How to center text in Photoshop using guides and snapping
How to center text on a portion of the canvas in Photoshop
How to center text using smart guides in Photoshop
Q: What are smart guides in Photoshop?
A: Smart guides are thin blue lines that appear when you move or transform an element near another element. They show you the alignment, distance, and angle between the elements. They also help you snap your elements to each other or to the canvas.
Q: How do I enable smart guides in Photoshop?
A: You can enable smart guides in Photoshop by going to View > Show > Smart Guides or by pressing Ctrl+U (Windows) or Command+U (Mac) on your keyboard.
Q: How do I use smart guides to center text in Photoshop?
A: You can use smart guides to center text in Photoshop by selecting the move tool and clicking and dragging your text layer until it aligns with the center of the canvas or another element. You will see blue lines indicating that your text is centered horizontally and vertically. You can also use the arrow keys to fine-tune your position.
How to center text using paragraph panel in Photoshop
Q: What is the paragraph panel in Photoshop?
A: The paragraph panel is a panel where you can change various text formatting options such as alignment, justification, indentation, spacing, and hyphenation. You can access it by clicking the Paragraph panel icon on the Options bar or by going to Window > Paragraph.
Q: How do I change the alignment of my text in Photoshop?
A: You can change the alignment of your text in Photoshop by using the paragraph panel. In the paragraph panel, you can choose from four alignment options: left, center, right, and justify. Left alignment aligns the text to the left edge of the text box. Center alignment aligns the text to the center of the text box. Right alignment aligns the text to the right edge of the text box. Justify alignment aligns the text to both edges of the text box by adjusting the spacing between words.
Q: How do I center justify my text in Photoshop?
A: You can center justify your text in Photoshop by using the paragraph panel. In the paragraph panel, click on the button that looks like four lines with a vertical line through them. This is the center justify button. It will align your text to the center of your text box by adjusting the spacing between words.
How to center text using layer styles in Photoshop
Q: What are layer styles in Photoshop?
A: Layer styles are presets that apply various attributes such as shadows, strokes, gradients, and patterns to your text layer. You can access them by clicking the Layer Style icon at the bottom of the Layers panel or by going to Layer > Layer Style.
Q: How do I apply a layer style to my text in Photoshop?
A: You can apply a layer style to your text in Photoshop by selecting your text layer and clicking on the Layer Style icon at the bottom of the Layers panel. This will open a dialog box where you can choose from various styles and customize their settings. You can also save your own styles and apply them to other text layers.
Q: How do I center my text with a layer style in Photoshop?
A: You can center your text with a layer style in Photoshop by using any of the methods described above, such as using the Move tool, using guides and snapping, or using padding or line-height. The layer style will not affect the alignment of your text, but it may change the appearance of your text. For example, if you apply a shadow to your text, it may create an illusion of depth or distance. You can adjust the angle and distance of the shadow in the Layer Style dialog box to match your desired effect.
How to center text in Photoshop with keyboard shortcuts
Q: What are keyboard shortcuts in Photoshop?
A: Keyboard shortcuts are combinations of keys that perform certain actions or commands in Photoshop. They can help you work faster and more efficiently by reducing the number of clicks and mouse movements.
Q: How do I use keyboard shortcuts to center text in Photoshop?
A: You can use keyboard shortcuts to center text in Photoshop by using the following keys:
- To select the Move tool, press V.
- To select the entire canvas, press Ctrl+A (Windows) or Command+A (Mac).
- To select a specific area of the canvas, press M and then click and drag on your canvas.
- To align horizontal centers, press Ctrl+Shift+C (Windows) or Command+Shift+C (Mac).
- To align vertical centers, press Ctrl+Shift+M (Windows) or Command+Shift+M (Mac).
- To deselect the canvas or the selection, press Ctrl+D (Windows) or Command+D (Mac).
Q: How do I customize keyboard shortcuts in Photoshop?
A: You can customize keyboard shortcuts in Photoshop by going to Edit > Keyboard Shortcuts or by pressing Ctrl+Alt+Shift+K (Windows) or Command+Option+Shift+K (Mac). This will open a dialog box where you can assign different keys to different commands or tools. You can also save your own sets of keyboard shortcuts and load them when needed.
How to center text in Photoshop for beginners
Q: How do I write text in Photoshop?
A: You can write text in Photoshop by using the Text tool (T). You can select the Text tool from the toolbar or press T on your keyboard. This will allow you to create a text layer on your canvas by clicking and typing.
Q: How do I choose a font, size, color, and style for my text in Photoshop?
A: You can choose a font, size, color, and style for your text in Photoshop by using the Options bar or the Character panel. On the Options bar at the top of the screen, you can select the font family, font style, font size, and font color from the drop-down menus. You can also use the buttons to change the alignment, anti-aliasing, and warp options for your text. On the Character panel, you can access more options for text formatting such as leading, kerning, tracking, baseline shift, and more. You can access the Character panel by clicking the Character panel icon on the Options bar or by going to Window > Character.
Q: How do I edit my text in Photoshop?
A: You can edit your text in Photoshop by selecting your text layer and double-clicking on it. This will activate the Text tool and put a blinking cursor on your text. You can then edit your text as you would normally do in any word processor. You can also use the arrow keys to move the cursor or the mouse to select a portion of your text. You can also use the keyboard shortcuts such as Ctrl+C (Windows) or Command+C (Mac) to copy, Ctrl+V (Windows) or Command+V (Mac) to paste, Ctrl+X (Windows) or Command+X (Mac) to cut, Ctrl+Z (Windows) or Command+Z (Mac) to undo, and Ctrl+Y (Windows) or Command+Shift+Z (Mac) to redo.
How to center text in Photoshop CC 2023
Q: What is Photoshop CC 2023?
A: Photoshop CC 2023 is the latest version of Adobe Photoshop, a popular and powerful software for creating and editing graphics, photos, designs, and more. Photoshop CC 2023 is part of Adobe Creative Cloud, a subscription-based service that gives you access to various Adobe applications and features.
Q: What are the new features of Photoshop CC 2023?
A: Photoshop CC 2023 has many new features and improvements that enhance your creativity and productivity. Some of the new features are:
- Neural Filters: These are AI-powered filters that let you apply various effects and transformations to your images, such as changing facial expressions, age, hair, lighting, color, and more.
- Sky Replacement: This is a feature that lets you replace the sky in your photos with a different one from a library of presets or your own images. You can also adjust the lighting and color of the foreground to match the new sky.
- Pattern Preview: This is a feature that lets you create seamless patterns from your images or shapes. You can preview how your pattern will look when repeated on a canvas or a mockup.
- Object Selection Tool: This is a tool that lets you select complex objects in your images with a single click or drag. It uses AI to detect the edges and contours of the objects and create a precise selection.
Q: How do I center text in Photoshop CC 2023?
A: You can center text in Photoshop CC 2023 by using any of the methods described above, such as using the Move tool, using guides and snapping, or using padding or line-height. The process is the same as in previous versions of Photoshop, except that you may see some changes in the interface or the options.
How to center text in Photoshop CS6
Q: What is Photoshop CS6?
A: Photoshop CS6 is an older version of Adobe Photoshop, a popular and powerful software for creating and editing graphics, photos, designs, and more. Photoshop CS6 was released in 2012 and was the last version before Adobe switched to the Creative Cloud subscription model.
Q: What are the main differences between Photoshop CS6 and Photoshop CC 2023?
A: Photoshop CS6 and Photoshop CC 2023 have many differences in terms of features, performance, compatibility, and support. Some of the main differences are:
- Features: Photoshop CC 2023 has many more features than Photoshop CS6, such as Neural Filters, Sky Replacement, Pattern Preview, Object Selection Tool, Content-Aware Fill Workspace, Frame Tool, Select Subject, Select and Mask Workspace, Face-Aware Liquify, Camera Raw Filter, Perspective Warp, Blur Gallery, Adaptive Wide Angle, Oil Paint Filter, and more.
- Performance: Photoshop CC 2023 has better performance than Photoshop CS6, as it uses more advanced technology and algorithms to process images faster and smoother. It also supports more file formats, color modes, bit depths, and image sizes.
- Compatibility: Photoshop CC 2023 is compatible with more operating systems, devices, applications, and plugins than Photoshop CS6. It also supports more languages and fonts.
- Support: Photoshop CC 2023 has more support than Photoshop CS6, as it receives regular updates, bug fixes, security patches, and new features from Adobe. It also has more online resources, tutorials, forums, and customer service.
Q: How do I center text in Photoshop CS6?
A: You can center text in Photoshop CS6 by using any of the methods described above, such as using the Move tool, using guides and snapping, or using padding or line-height. The process is similar to newer versions of Photoshop, except that you may see some differences in the interface or the options.
How to center text in Photoshop Elements
Q: What is Photoshop Elements?
A: Photoshop Elements is a simplified version of Adobe Photoshop, a popular and powerful software for creating and editing graphics, photos, designs, and more. Photoshop Elements is designed for beginners and hobbyists who want to edit and enhance their photos without learning the complex tools and features of Photoshop.
Q: What are the main differences between Photoshop Elements and Photoshop CC 2023?
A: Photoshop Elements and Photoshop CC 2023 have many differences in terms of features, functionality, price, and target audience. Some of the main differences are:
- Features: Photoshop Elements has fewer features than Photoshop CC 2023, as it focuses on basic photo editing and enhancement tasks. It does not have advanced features such as Neural Filters, Sky Replacement, Pattern Preview, Object Selection Tool, Content-Aware Fill Workspace, Frame Tool, Select Subject, Select and Mask Workspace, Face-Aware Liquify, Camera Raw Filter, Perspective Warp, Blur Gallery, Adaptive Wide Angle, Oil Paint Filter, and more.
- Functionality: Photoshop Elements has a simpler and more user-friendly interface than Photoshop CC 2023, as it offers three modes of editing: Quick, Guided, and Expert. Quick mode lets you make simple adjustments and corrections to your photos with one-click options. Guided mode lets you follow step-by-step instructions to apply various effects and transformations to your photos. Expert mode lets you use more advanced tools and layers to edit your photos with more control and creativity.
- Price: Photoshop Elements is cheaper than Photoshop CC 2023, as it is a one-time purchase and does not require a subscription. You can buy Photoshop Elements for $99.99 USD or get it with Adobe Premiere Elements (a video editing software) for $149.99 USD. Photoshop CC 2023 is part of Adobe Creative Cloud, a subscription-based service that gives you access to various Adobe applications and features. You can get Photoshop CC 2023 for $20.99 USD per month or get it with other Adobe applications for $52.99 USD per month.
- Target Audience: Photoshop Elements is aimed at beginners and hobbyists who want to edit and enhance their photos easily and quickly without learning the complex tools and features of Photoshop. Photoshop CC 2023 is aimed at professionals and enthusiasts who want to create and edit graphics, photos, designs, and more with the most advanced and powerful tools and features available.
Q: How do I center text in Photoshop Elements?
A: You can center text in Photoshop Elements by using any of the methods described above, such as using the Move tool, using guides and snapping, or using padding or line-height. The process is similar to Photoshop CC 2023, except that you may see some differences in the interface or the options. For example, in Photoshop Elements, you can access the Align section on the Options bar by clicking on the More button. You can also access the Character panel by clicking on the Text tool icon on the Options bar.
How to center text in Photoshop online
Q: What is Photoshop online?
A: Photoshop online is a web-based version of Adobe Photoshop, a popular and powerful software for creating and editing graphics, photos, designs, and more. Photoshop online lets you access and edit your Photoshop files from any browser or device, without installing any software.
Q: What are the benefits of using Photoshop online?
A: Some of the benefits of using Photoshop online are:
- You can work on your Photoshop files from anywhere, anytime, and on any device.
- You can collaborate with others on your Photoshop files in real-time, with comments, annotations, and version history.
- You can sync your Photoshop files with Adobe Creative Cloud, Google Drive, Dropbox, or OneDrive, and access them from any Adobe application or device.
- You can use most of the features and tools of Photoshop CC 2023, such as Neural Filters, Sky Replacement, Object Selection Tool, Content-Aware Fill Workspace, Frame Tool, Select Subject, Select and Mask Workspace, Face-Aware Liquify, Camera Raw Filter, and more.
Q: How do I center text in Photoshop online?
A: You can center text in Photoshop online by using any of the methods described above, such as using the Move tool, using guides and snapping, or using padding or line-height. The process is similar to Photoshop CC 2023, except that you may see some differences in the interface or the options. For example, in Photoshop online, you can access the Align section on the Options bar by clicking on the More button. You can also access the Character panel by clicking on the Text tool icon on the Options bar.
How to center text in Photoshop without distorting it
Q: What does distorting text mean in Photoshop?
A: Distorting text means changing the shape or appearance of text in Photoshop by applying various transformations or effects. For example, you can distort text by scaling it disproportionately, rotating it at an angle, skewing it horizontally or vertically, warping it into a curve or a shape, or applying a perspective or a 3D effect.
Q: Why would I want to avoid distorting text in Photoshop?
A: You may want to avoid distorting text in Photoshop if you want to preserve the readability and clarity of your text. Distorting text may make your text look more creative or dynamic, but it may also make it harder to read or understand. Distorting text may also affect the quality and resolution of your text, making it look pixelated or blurry.
Q: How do I center text in Photoshop without distorting it?
A: You can center text in Photoshop without distorting it by using any of the methods described above, such as using the Move tool, using guides and snapping, or using padding or line-height. These methods will not change the shape or appearance of your text, but only its position on the canvas or a selection. You can also use the Align section on the Options bar to align your text with other elements on your canvas without distorting it.
How to center text in Photoshop with different fonts and sizes
Q: How do I change the font of my text in Photoshop?
A: You can change the font of your text in Photoshop by using the Options bar or the Character panel. On the Options bar at the top of the screen, you can select the font family and font style from the drop-down menus. You can also use the buttons to change the anti-aliasing and warp options for your text. On the Character panel, you can access more options for text formatting such as leading, kerning, tracking, baseline shift, and more. You can access the Character panel by clicking the Character panel icon on the Options bar or by going to Window > Character.
Q: How do I change the size of my text in Photoshop?
A: You can change the size of your text in Photoshop by using the Options bar or the Character panel. On the Options bar at the top of the screen, you can enter the font size in pixels in the field next to the font family menu. You can also use the buttons to increase or decrease the font size by small increments. On the Character panel, you can enter the font size in points in the field next to the font style menu. You can also use the buttons to increase or decrease the font size by large increments.
Q: How do I center text with different fonts and sizes in Photoshop?
A: You can center text with different fonts and sizes in Photoshop by using any of the methods described above, such as using the Move tool, using guides and snapping, or using padding or line-height. These methods will center your text based on the bounding box of your text layer, which may vary depending on the font and size of your text. You can also use the Align section on the Options bar to align your text with other elements on your canvas without affecting its font or size.
How to center text in Photoshop with multiple layers
Q: What are layers in Photoshop?
A: Layers are like transparent sheets that stack on top of each other to create a composite image in Photoshop. Each layer can contain different elements such as text, images, shapes, effects, and more. You can edit, move, transform, hide, show, lock, merge, group, and organize your layers independently without affecting other layers.
Q: How do I create multiple text layers in Photoshop?
A: You can create multiple text layers in Photoshop by using the Text tool (T). You can select the Text tool from the toolbar or press T on your keyboard. This will allow you to create a text layer on your canvas by clicking and typing. To create another text layer, you can click on a different area of your canvas and type again. You can also duplicate an existing text layer by selecting it and pressing Ctrl+J (Windows) or Command+J (Mac) on your keyboard.
Q: How do I center text with multiple layers in Photoshop?
A: You can center text with multiple layers in Photoshop by using any of the methods described above, such as using the Move tool, using guides and snapping, or using padding or line-height. These methods will center your text based on the bounding box of your text layer, which may vary depending on the number and position of your text layers. You can also use the Align section on the Options bar to align your text layers with each other or with other elements on your canvas without affecting their number or position.
How to center text in Photoshop with different alignment options
Q: What are alignment options in Photoshop?
A: Alignment options are options that let you change how your text is aligned within its bounding box or its paragraph in Photoshop. There are four alignment options: left, center, right, and justify. Left alignment aligns the text to the left edge of the bounding box or paragraph. Center alignment aligns the text to the center of the bounding box or paragraph. Right alignment aligns the text to the right edge of the bounding box or paragraph. Justify alignment aligns the text to both edges of the bounding box or paragraph by adjusting the spacing between words.
Q: How do I change the alignment option of my text in Photoshop?
A: You can change the alignment option of your text in Photoshop by using the Options bar or the Paragraph panel. On the Options bar at the top of the screen, you can click on one of the four buttons that represent the alignment options: left, center, right, and justify. These buttons are located next to the font family menu. On the Paragraph panel, you can click on one of the four buttons that represent the alignment options: left, center, right, and justify. These buttons are located at the top of the panel. You can access the Paragraph panel by clicking the Paragraph panel icon on the Options bar or by going to Window > Paragraph.
Q: How do I center text with different alignment options in Photoshop?
A: You can center text with different alignment options in Photoshop by using any of the methods described above, such as using the Move tool, using guides and snapping, or using padding or line-height. These methods will center your text based on the bounding box of your text layer, which may vary depending on the alignment option of your text. You can also use the Align section on the Options bar to align your text with other elements on your canvas without affecting its alignment option.
How to center text in Photoshop with different justification options
Q: What are justification options in Photoshop?
A: Justification options are options that let you change how your text is spaced within its bounding box or its paragraph in Photoshop. There are four justification options: left, center, right, and force. Left justification spaces the text evenly between the left edge of the bounding box or paragraph and the right edge of the longest line of text. Center justification spaces the text evenly between the left and right edges of the bounding box or paragraph. Right justification spaces the text evenly between the right edge of the bounding box or paragraph and the left edge of the longest line of text. Force justification spaces the text evenly between the left and right edges of the bounding box or paragraph by adjusting the spacing between words and letters.
Q: How do I change the justification option of my text in Photoshop?
A: You can change the justification option of your text in Photoshop by using the Options bar or the Paragraph panel. On the Options bar at the top of the screen, you can click on one of the four buttons that represent the justification options: left, center, right, and force. These buttons are located next to the alignment buttons. On the Paragraph panel, you can click on one of the four buttons that represent the justification options: left, center, right, and force. These buttons are located below the alignment buttons. You can access the Paragraph panel by clicking the Paragraph panel icon on the Options bar or by going to Window > Paragraph.
Q: How do I center text with different justification options in Photoshop?
A: You can center text with different justification options in Photoshop by using any of the methods described above, such as using the Move tool, using guides and snapping, or using padding or line-height. These methods will center your text based on the bounding box of your text layer, which may vary depending on the justification option of your text. You can also use the Align section on the Options bar to align your text with other elements on your canvas without affecting its justification option.
How to center text in Photoshop with different effects and enhancements
Q: What are effects and enhancements in Photoshop?
A: Effects and enhancements are options that let you add various attributes such as shadows, strokes, gradients, patterns, textures, filters, and more to your text layer in Photoshop. They can help you create more realistic, artistic, or dramatic effects for your text.
Q: How do I add effects and enhancements to my text in Photoshop?
A: You can add effects and enhancements to your text in Photoshop by using the Layer Style dialog box or the Filter menu. To use the Layer Style dialog box, you can select your text layer and click on the Layer Style icon at the bottom of the Layers panel or go to Layer > Layer Style. This will open a dialog box where you can choose from various styles and customize their settings. You can also save your own styles and apply them to other text layers. To use the Filter menu, you can select your text layer and go to Filter > Filter Gallery or Filter > Other Filters. This will open a dialog box where you can choose from various filters and adjust their settings. You can also apply multiple filters to your text layer by using smart filters.
Q: How do I center text with different effects and enhancements in Photoshop?
A: You can center text with different effects and enhancements in Photoshop by using any of the methods described above, such as using the Move tool, using guides and snapping, or using padding or line-height. These methods will center your text based on the bounding box of your text layer, which may vary depending on the effects and enhancements that you applied to your text. You can also use the Align section on the Options bar to align your text with other elements on your canvas without affecting its effects and enhancements.
How to center text in a circle or a shape in Photoshop
Q: How do I create a circle or a shape in Photoshop?
A: You can create a circle or a shape in Photoshop by using the Shape tool (U). You can select the Shape tool from the toolbar or press U on your keyboard. This will allow you to create a shape layer on your canvas by clicking and dragging. You can choose from various shapes such as rectangles, rounded rectangles, ellipses, polygons, lines, custom shapes, and more. You can also adjust the fill color, stroke color, stroke width, stroke style, and other properties of your shape.
Q: How do I write text in a circle or a shape in Photoshop?
A: You can write text in a circle or a shape in Photoshop by using the Text tool (T) and the Path Selection tool (A). Here are the steps to follow:
- Create a circle or a shape using the Shape tool (U).
- Select the Text tool (T) from the toolbar or press T on your keyboard. This will allow you to write text on your canvas by clicking and typing.
- Move your cursor over the edge of your circle or shape until you see a small wavy line next to it. This indicates that you can write text along the path of your circle or shape.
- Click on the edge of your circle or shape and start typing your text. Your text will follow the path of your circle or shape.
- Select the Path Selection tool (A) from the toolbar or press A on your keyboard. This will allow you to move and transform your text along the path of your circle or shape.
- Click and drag your text to adjust its position on the path. You can also use the arrow keys to move it by small increments.
- Press Ctrl+T (Windows) or Command+T (Mac) to activate the Free Transform mode. This will put a bounding box around your text.
- Click and drag the handles of the bounding box to resize, rotate, skew, or distort your text. You can also use the Options bar at the top of the screen to change the angle, width, height, and other properties of your text.
Q: How do I center text in a circle or a shape in Photoshop?
A: You can center text in a circle or a shape in Photoshop by using any of the methods described above, such as using the Move tool, using guides and snapping, or using padding or line-height. These methods will center your text based on the bounding box of your text layer, which may vary depending on the shape and size of your circle or shape. You can also use the Align section on the Options bar to align your text with other elements on your canvas without affecting its shape or size.
How to center text along a path or a curve in Photoshop
Q: What is a path or a curve in Photoshop?
A: A path or a curve is a vector-based line that can have any shape or direction in Photoshop. You can create a path or a curve by using the Pen tool (P), the Freeform Pen tool, the Curvature Pen tool, or the Custom Shape tool. You can also convert a selection, a shape, or a text layer into a path or a curve.
Q: How do I write text along a path or a curve in Photoshop?
A: You can write text along a path or a curve in Photoshop by using the Text tool (T) and the Path Selection tool (A). Here are the steps to follow:
- Create a path or a curve using any of the tools mentioned above.
- Select the Text tool (T) from the toolbar or press T on your keyboard. This will allow you to write text on your canvas by clicking and typing.
- Move your cursor over the edge of your path or curve until you see a small wavy line next to it. This indicates that you can write text along the path or curve.
- Click on the edge of your path or curve and start typing your text. Your text will follow the shape and direction of your path or curve.
- Select the Path Selection tool (A) from the toolbar or press A on your keyboard. This will allow you to move and transform your text along the path or curve.
- Click and drag your text to adjust its position on the path or curve. You can also use the arrow keys to move it by small increments.
- Press Ctrl+T (Windows) or Command+T (Mac) to activate the Free Transform mode. This will put a bounding box around your text.
- Click and drag the handles of the bounding box to resize, rotate, skew, or distort your text. You can also use the Options bar at the top of the screen to change the angle, width, height, and other properties of your text.
Q: How do I center text along a path or a curve in Photoshop?
A: You can center text along a path or a curve in Photoshop by using any of the methods described above, such as using the Move tool, using guides and snapping, or using padding or line-height. These methods will center your text based on the bounding box of your text layer, which may vary depending on the shape and direction of your path or curve. You can also use the Align section on the Options bar to align your text with other elements on your canvas without affecting its shape or direction.
How to center text inside a frame or a border in Photoshop
Q: What is a frame or a border in Photoshop?
A: A frame or a border is an element that surrounds an image, a shape, a text, or another element in Photoshop. You can create a frame or a border by using various tools and techniques such as drawing shapes, applying strokes, adding layer styles, using clipping masks, and more.
Q: How do I create a frame or a border in Photoshop?
A: You can create a frame or a border in Photoshop by using any of the tools and techniques mentioned above. Here are some examples:
- To create a frame or a border by drawing shapes, you can use the Shape tool (U) to draw a rectangle, an ellipse, or another shape on your canvas. You can adjust the fill color, stroke color, stroke width, stroke style, and other properties of your shape. You can also use the Transform options to resize, rotate, skew, or distort your shape.
- To create a frame or a border by applying strokes, you can use the Stroke dialog box to add an outline to an image, a shape, a text, or another element. You can access the Stroke dialog box by going to Edit > Stroke. You can choose the color, width, location, blending mode, and opacity of your stroke.
- To create a frame or a border by adding layer styles, you can use the Layer Style dialog box to add various effects such as shadows, strokes, gradients, patterns, textures, and more to an image, a shape, a text, or another element. You can access the Layer Style dialog box by selecting your layer and clicking on the Layer Style icon at the bottom of the Layers panel or going to Layer > Layer Style. You can choose from various styles and customize their settings.
- To create a frame or a border by using clipping masks, you can use an image, a shape, a text, or another element as a mask for another layer. You can access the clipping mask option by selecting your mask layer and pressing Ctrl+Alt+G (Windows) or Command+Option+G (Mac) on your keyboard. This will clip your layer to the shape and transparency of your mask layer.
Q: How do I center text inside a frame or a border in Photoshop?
A: You can center text inside a frame or a border in Photoshop by using any of the methods described above, such as using the Move tool, using guides and snapping, or using padding or line-height. These methods will center your text based on the bounding box of your text layer, which may vary depending on the size and shape of your frame or border. You can also use the Align section on the Options bar to align your text with other elements on your canvas without affecting its frame or border.
How to center text over an image or a background in Photoshop
Q: How do I insert an image or a background in Photoshop?
A: You can insert an image or a background in Photoshop by using the File menu, the Place command, or the Drag and Drop method. Here are some examples:
- To insert an image or a background by using the File menu, you can go to File > Open and browse for the image file that you want to insert. This will open the image as a new document in Photoshop. You can then copy and paste it into your existing document as a new layer.
- To insert an image or a background by using the Place command, you can go to File > Place Embedded or File > Place Linked and browse for the image file that you want to insert. This will place the image as a smart object on your existing document. You can then resize, rotate, or position it as you like.
- To insert an image or a background by using the Drag and Drop method, you can open the image file in another application such as Windows Explorer or Finder and drag it onto your existing document in Photoshop. This will place the image as a smart object on your existing document. You can then resize, rotate, or position it as you like.
Q: How do I write text over an image or a background in Photoshop?
A: You can write text over an image or a background in Photoshop by using the Text tool (T). You can select the Text tool from the toolbar or press T on your keyboard. This will allow you to create a text layer on your canvas by clicking and typing. You can choose any font, size, color, and style you want.
Q: How do I center text over an image or a background in Photoshop?
A: You can center text over an image or a background in Photoshop by using any of the methods described above, such as using the Move tool, using guides and snapping, or using padding or line-height. These methods will center your text based on the bounding box of your text layer, which may vary depending on the size and shape of your image or background. You can also use the Align section on the Options bar to align your text with other elements on your canvas without affecting its image or background.
How to center text around an object or a focal point in Photoshop
Q: What is an object or a focal point in Photoshop?
A: An object or a focal point is an element that attracts attention or interest in an image, such as a person, an animal, a building, a flower, or a logo. You can use various tools and techniques to select, isolate, enhance, or emphasize an object or a focal point in Photoshop.
Q: How do I select an object or a focal point in Photoshop?
A: You can select an object or a focal point in Photoshop by using various tools and techniques such as the Quick Selection tool, the Magic Wand tool, the Lasso tool, the Pen tool, the Object Selection tool, the Select Subject command, the Select and Mask workspace, and more. Here are some examples:
- To select an object or a focal point by using the Quick Selection tool (W), you can select the Quick Selection tool from the toolbar or press W on your keyboard. This will allow you to create a selection by clicking and dragging over the object or focal point that you want to select. The tool will automatically detect the edges and contours of the object or focal point and create a precise selection.
- To select an object or a focal point by using the Magic Wand tool (W), you can select the Magic Wand tool from the toolbar or press W on your keyboard. This will allow you to create a selection by clicking on the object or focal point that you want to select. The tool will automatically select all the pixels that have similar colors and tones to the pixel that you clicked on. You can adjust the tolerance level of the tool to make it more or less sensitive to color variations.
- To select an object or a focal point by using the Lasso tool (L), you can select the Lasso tool from the toolbar or press L on your keyboard. This will allow you to create a selection by clicking and dragging around the object or focal point that you want to select. The tool will create a freehand selection that follows your mouse movement. You can also use the Polygonal Lasso tool or the Magnetic Lasso tool to create straight-edged or snap-to-edge selections.
Q: How do I center text around an object or a focal point in Photoshop?
A: You can center text around an object or a focal point in Photoshop by using any of the methods described above, such as using the Move tool, using guides and snapping, or using padding or line-height. These methods will center your text based on the bounding box of your text layer, which may vary depending on the position and shape of your object or focal point. You can also use the Align section on the Options bar to align your text with other elements on your canvas without affecting its object or focal point.
How to center text for a poster, a flyer, or a banner in Photoshop
Q: What is a poster, a flyer, or a banner in Photoshop?
A: A poster, a flyer, or a banner is a type of design that is used to promote, advertise, or inform about something in Photoshop. A poster is a large printed sheet of paper that is usually displayed on a wall or a board. A flyer is a small printed sheet of paper that is usually handed out or distributed to people. A banner is a long strip of cloth or paper that is usually hung across a street or a building.
Q: How do I create a poster, a flyer, or a banner in Photoshop?
A: You can create a poster, a flyer, or a banner in Photoshop by using various tools and techniques such as the New Document dialog box, the Canvas Size dialog box, the Crop tool, the Text tool, the Shape tool, the Layer Style dialog box, the Filter menu, and more. Here are some examples:
- To create a poster, a flyer, or a banner by using the New Document dialog box, you can go to File > New or press Ctrl+N (Windows) or Command+N (Mac) on your keyboard. This will open the New Document dialog box where you can choose the preset size, resolution, color mode, and background color for your document. You can also enter your own custom values for these settings. You can choose from various presets such as Photo, Print, Art & Illustration, Web, Mobile, Film & Video, and more. You can also save your own presets and use them later.
- To create a poster, a flyer, or a banner by using the Canvas Size dialog box, you can go to Image > Canvas Size or press Ctrl+Alt+C (Windows) or Command+Option+C (Mac) on your keyboard. This will open the Canvas Size dialog box where you can change the width and height of your document. You can also change the anchor point and the canvas extension color for your document.
- To create a poster, a flyer, or a banner by using the Crop tool ©, you can select the Crop tool from the toolbar or press C on your keyboard. This will allow you to crop your document by clicking and dragging on your canvas. You can also use the Options bar at the top of the screen to change the aspect ratio, resolution, and other settings for your crop.
Q: How do I center text for a poster, a flyer, or a banner in Photoshop?
A: You can center text for a poster, a flyer, or a banner in Photoshop by using any of the methods described above, such as using the Move tool, using guides and snapping, or using padding or line-height. These methods will center your text based on the bounding box of your text layer, which may vary depending on the size and shape of your document. You can also use the Align section on the Options bar to align your text with other elements on your canvas without affecting its document size.
How to center text vertically in Photoshop
Q: What does centering text vertically mean in Photoshop?
A: Centering text vertically means aligning the text evenly between the top and bottom margins of the canvas or a selection in Photoshop. It is also known as vertical alignment or vertical centering.
Q: Why would I want to center text vertically in Photoshop?
A: You may want to center text vertically in Photoshop if you want to create a balanced, symmetrical, or harmonious design for your text. Centering text vertically can also help you emphasize or highlight your text, especially if it is short or has a large font size.
Q: How do I center text vertically in Photoshop?
A: You can center text vertically in Photoshop by using any of the methods described above, such as using the Move tool, using guides and snapping, or using padding or line-height. These methods will center your text based on the bounding box of your text layer, which may vary depending on the font and size of your text. You can also use the Align section on the Options bar to align your text with other elements on your canvas without affecting its font or size. Here are the steps to follow:
- Write your text using the Text tool (T). You can choose any font, size, color, and style you want.
- Select the Move tool (V) from the toolbar or press V on your keyboard. This will put a bounding box around your text layer.
- If you want to center your text on the entire canvas, press Ctrl+A (Windows) or Command+A (Mac) to select the entire canvas. You will see a dotted line around the edges of the canvas indicating the selection.
- If you want to center your text on a specific area of the canvas, select the Rectangular Marquee tool (M) from the toolbar or press M on your keyboard. Click and drag on your canvas to create a selection that covers the area where you want to center your text. You can adjust the size and position of your selection by holding Shift or Alt (Windows) or Option (Mac) while dragging.
- On the Options bar at the top of the screen, click the Align Vertical Centers button. This is the third button from the left in the Align section. It looks like two squares with a horizontal line through them. This will align the center of your text layer with the center of the canvas or the selection.
- Press Ctrl+D (Windows) or Command+D (Mac) to deselect the canvas or the selection.
Your text is now centered vertically on the canvas or the selection. You can adjust its position by clicking and dragging it with the Move tool. You can also use the arrow keys to move it by small increments.
How to center text horizontally in Photoshop
Q: What does centering text horizontally mean in Photoshop?
A: Centering text horizontally means aligning the text evenly between the left and right margins of the canvas or a selection in Photoshop. It is also known as horizontal alignment or horizontal centering.
Q: Why would I want to center text horizontally in Photoshop?
A: You may want to center text horizontally in Photoshop if you want to create a balanced, symmetrical, or harmonious design for your text. Centering text horizontally can also help you emphasize or highlight your text, especially if it is short or has a large font size.
Q: How do I center text horizontally in Photoshop?
A: You can center text horizontally in Photoshop by using any of the methods described above, such as using the Move tool, using guides and snapping, or using padding or line-height. These methods will center your text based on the bounding box of your text layer, which may vary depending on the font and size of your text. You can also use the Align section on the Options bar to align your text with other elements on your canvas without affecting its font or size. Here are the steps to follow:
- Write your text using the Text tool (T). You can choose any font, size, color, and style you want.
- Select the Move tool (V) from the toolbar or press V on your keyboard. This will put a bounding box around your text layer.
- If you want to center your text on the entire canvas, press Ctrl+A (Windows) or Command+A (Mac) to select the entire canvas. You will see a dotted line around the edges of the canvas indicating the selection.
- If you want to center your text on a specific area of the canvas, select the Rectangular Marquee tool (M) from the toolbar or press M on your keyboard. Click and drag on your canvas to create a selection that covers the area where you want to center your text. You can adjust the size and position of your selection by holding Shift or Alt (Windows) or Option (Mac) while dragging.
- On the Options bar at the top of the screen, click the Align Horizontal Centers button. This is the second button from the left in the Align section. It looks like two squares with a vertical line through them. This will align the center of your text layer with the center of the canvas or the selection.
- Press Ctrl+D (Windows) or Command+D (Mac) to deselect the canvas or the selection.
Your text is now centered horizontally on the canvas or the selection. You can adjust its position by clicking and dragging it with the Move tool. You can also use the arrow keys to move it by small increments.
How to center text for a logo or a watermark in Photoshop
Q: What is a logo or a watermark in Photoshop?
A: A logo or a watermark is a type of design that is used to identify, represent, or protect something in Photoshop. A logo is a symbol, word, or combination of both that is used to identify a brand, a company, a product, or a service. A watermark is a faint image or text that is overlaid on another image or document to indicate the ownership, origin, or authenticity of the original.
Q: How do I create a logo or a watermark in Photoshop?
A: You can create a logo or a watermark in Photoshop by using various tools and techniques such as the Text tool, the Shape tool, the Custom Shape tool, the Pen tool, the Brush tool, the Layer Style dialog box, the Filter menu, and more. Here are some examples:
- To create a logo or a watermark by using the Text tool (T), you can select the Text tool from the toolbar or press T on your keyboard. This will allow you to write text on your canvas by clicking and typing. You can choose any font, size, color, and style you want. You can also use the Warp Text option on the Options bar to bend or distort your text into various shapes.
- To create a logo or a watermark by using the Shape tool (U), you can select the Shape tool from the toolbar or press U on your keyboard. This will allow you to draw a shape on your canvas by clicking and dragging. You can choose from various shapes such as rectangles, rounded rectangles, ellipses, polygons, lines, custom shapes, and more. You can also adjust the fill color, stroke color, stroke width, stroke style, and other properties of your shape.
- To create a logo or a watermark by using the Custom Shape tool (U), you can select the Custom Shape tool from the toolbar or press U on your keyboard. This will allow you to draw a custom shape on your canvas by clicking and dragging. You can choose from various custom shapes such as arrows, stars, hearts, flowers, animals, logos, and more. You can also load your own custom shapes or download them from online sources.
- To create a logo or a watermark by using the Pen tool (P), you can select the Pen tool from the toolbar or press P on your keyboard. This will allow you to draw a path on your canvas by clicking and dragging. You can create any shape or curve you want with the Pen tool. You can also convert your path into a selection, a shape layer, or a vector mask.
- To create a logo or a watermark by using the Brush tool (B), you can select the Brush tool from the toolbar or press B on your keyboard. This will allow you to paint on your canvas by clicking and dragging. You can choose any brush size, shape, hardness, opacity, flow, and mode you want. You can also use various brush presets such as calligraphic brushes, artistic brushes, natural brushes, special effect brushes, and more.
Q: How do I center text for a logo or a watermark in Photoshop?
A: You can center text for a logo or a watermark in Photoshop by using any of the methods described above, such as using the Move tool, using guides and snapping, or using padding or line-height. These methods will center your text based on the bounding box of your text layer, which may vary depending on the size and shape of your logo or watermark. You can also use the Align section on the Options bar to align your text with other elements on your canvas without affecting its logo or watermark size.
How to center text for a website or a blog in Photoshop
Q: What is a website or a blog in Photoshop?
A: A website or a blog is a type of design that is used to create and publish online content such as articles, images, videos, podcasts, and more in Photoshop. A website is a collection of web pages that are linked together by a domain name and hosted on a server. A blog is a type of website that is updated regularly with new posts, usually in reverse chronological order.
Q: How do I create a website or a blog in Photoshop?
A: You can create a website or a blog in Photoshop by using various tools and techniques such as the New Document dialog box, the Artboard tool, the Text tool, the Shape tool, the Layer Style dialog box, the Export As dialog box, and more. Here are some examples:
- To create a website or a blog by using the New Document dialog box, you can go to File > New or press Ctrl+N (Windows) or Command+N (Mac) on your keyboard. This will open the New Document dialog box where you can choose the preset size, resolution, color mode, and background color for your document. You can also enter your own custom values for these settings. You can choose from various presets such as Web, Mobile, Film & Video, Art & Illustration, Photo, Print, and more. You can also save your own presets and use them later.
- To create a website or a blog by using the Artboard tool (V), you can select the Artboard tool from the toolbar or press V on your keyboard. This will allow you to create multiple artboards on your canvas by clicking and dragging. Artboards are like separate documents that can have different sizes and orientations. You can use artboards to create different layouts or pages for your website or blog. You can also adjust the size, position, name, and background color of your artboards.
- To create a website or a blog by using the Text tool (T), you can select the Text tool from the toolbar or press T on your keyboard. This will allow you to write text on your canvas by clicking and typing. You can choose any font, size, color, and style you want. You can also use the Warp Text option on the Options bar to bend or distort your text into various shapes.
- To create a website or a blog by using the Shape tool (U), you can select the Shape tool from the toolbar or press U on your keyboard. This will allow you to draw a shape on your canvas by clicking and dragging. You can choose from various shapes such as rectangles, rounded rectangles, ellipses, polygons, lines, custom shapes, and more. You can also adjust the fill color, stroke color, stroke width, stroke style, and other properties of your shape.
- To create a website or a blog by using the Layer Style dialog box, you can select your layer and click on the Layer Style icon at the bottom of the Layers panel or go to Layer > Layer Style. This will open a dialog box where you can choose from various styles and customize their settings. You can add various effects such as shadows, strokes, gradients, patterns, textures, and more to your layer.
- To create a website or a blog by using the Export As dialog box, you can select your layer or artboard and go to File > Export > Export As. This will open a dialog box where you can choose the file format, quality, size, and other options for exporting your layer or artboard. You can export your layer or artboard as JPEG, PNG, GIF, SVG, or PDF files.
Q: How do I center text for a website or a blog in Photoshop?
A: You can center text for a website or a blog in Photoshop by using any of the methods described above, such as using the Move tool, using guides and snapping, or using padding or line-height. These methods will center your text based on the bounding box of your text layer, which may vary depending on the size and shape of your document. You can also use the Align section on the Options bar to align your text with other elements on your canvas without affecting its document size.
How to center text for a social media post or a meme in Photoshop
Q: What is a social media post or a meme in Photoshop?
A: A social media post or a meme is a type of design that is used to share or express something on social media platforms such as Facebook, Twitter, Instagram, Reddit, and more in Photoshop. A social media post is a message, image, video, or link that is posted on a social media account or page. A meme is a humorous or catchy image, video, text, or combination of both that is spread online, usually with slight variations.
Q: How do I create a social media post or a meme in Photoshop?
A: You can create a social media post or a meme in Photoshop by using various tools and techniques such as the New Document dialog box, the Text tool, the Shape tool, the Custom Shape tool, the Pen tool, the Brush tool, the Layer Style dialog box, the Filter menu, and more. Here are some examples:
- To create a social media post or a meme by using the New Document dialog box, you can go to File > New or press Ctrl+N (Windows) or Command+N (Mac) on your keyboard. This will open the New Document dialog box where you can choose the preset size, resolution, color mode, and background color for your document. You can also enter your own custom values for these settings. You can choose from various presets such as Web, Mobile, Film & Video, Art & Illustration, Photo, Print, and more. You can also save your own presets and use them later.
- To create a social media post or a meme by using the Text tool (T), you can select the Text tool from the toolbar or press T on your keyboard. This will allow you to write text on your canvas by clicking and typing. You can choose any font, size, color, and style you want. You can also use the Warp Text option on the Options bar to bend or distort your text into various shapes.
- To create a social media post or a meme by using the Shape tool (U), you can select the Shape tool from the toolbar or press U on your keyboard. This will allow you to draw a shape on your canvas by clicking and dragging. You can choose from various shapes such as rectangles, rounded rectangles, ellipses, polygons, lines, custom shapes, and more. You can also adjust the fill color, stroke color, stroke width, stroke style, and other properties of your shape.
- To create a social media post or a meme by using the Custom Shape tool (U), you can select the Custom Shape tool from the toolbar or press U on your keyboard. This will allow you to draw a custom shape on your canvas by clicking and dragging. You can choose from various custom shapes such as arrows, stars, hearts, flowers, animals, logos, and more. You can also load your own custom shapes or download them from online sources.
- To create a social media post or a meme by using the Pen tool (P), you can select the Pen tool from the toolbar or press P on your keyboard. This will allow you to draw a path on your canvas by clicking and dragging. You can create any shape or curve you want with the Pen tool. You can also convert your path into a selection, a shape layer, or a vector mask.
- To create a social media post or a meme by using the Brush tool (B), you can select the Brush tool from the toolbar or press B on your keyboard. This will allow you to paint on your canvas by clicking and dragging. You can choose any brush size, shape, hardness, opacity, flow, and mode you want. You can also use various brush presets such as calligraphic brushes, artistic brushes, natural brushes, special effect brushes, and more.
Q: How do I center text for a social media post or a meme in Photoshop?
A: You can center text for a social media post or a meme in Photoshop by using any of the methods described above, such as using the Move tool, using guides and snapping, or using padding or line-height. These methods will center your text based on the bounding box of your text layer, which may vary depending on the size and shape of your document. You can also use the Align section on the Options bar to align your text with other elements on your canvas without affecting its document size.
How to center text for a book cover or a magazine cover in Photoshop
Q: What is a book cover or a magazine cover in Photoshop?
A: A book cover or a magazine cover is a type of design that is used to create and print the front or back cover of a book or a magazine in Photoshop. A book cover or a magazine cover usually contains the title, the author, the publisher, the genre, the summary, the price, the barcode, and other information about the book or the magazine. It may also contain images, graphics, colors, fonts, and styles that reflect the theme or mood of the book or the magazine.
Q: How do I create a book cover or a magazine cover in Photoshop?
A: You can create a book cover or a magazine cover in Photoshop by using various tools and techniques such as the New Document dialog box, the Text tool, the Shape tool, the Custom Shape tool, the Pen tool, the Brush tool, the Layer Style dialog box, the Filter menu, and more. Here are some examples:
- To create a book cover or a magazine cover by using the New Document dialog box, you can go to File > New or press Ctrl+N (Windows) or Command+N (Mac) on your keyboard. This will open the New Document dialog box where you can choose the preset size, resolution, color mode, and background color for your document. You can also enter your own custom values for these settings. You can choose from various presets such as Photo, Print, Art & Illustration, Web, Mobile, Film & Video, and more. You can also save your own presets and use them later.
- To create a book cover or a magazine cover by using the Text tool (T), you can select the Text tool from the toolbar or press T on your keyboard. This will allow you to write text on your canvas by clicking and typing. You can choose any font, size, color, and style you want. You can also use the Warp Text option on the Options bar to bend or distort your text into various shapes.
- To create a book cover or a magazine cover by using the Shape tool (U), you can select the Shape tool from the toolbar or press U on your keyboard. This will allow you to draw a shape on your canvas by clicking and dragging. You can choose from various shapes such as rectangles, rounded rectangles, ellipses, polygons, lines, custom shapes, and more. You can also adjust the fill color, stroke color, stroke width, stroke style, and other properties of your shape.
- To create a book cover or a magazine cover by using the Custom Shape tool (U), you can select the Custom Shape tool from the toolbar or press U on your keyboard. This will allow you to draw a custom shape on your canvas by clicking and dragging. You can choose from various custom shapes such as arrows, stars, hearts, flowers, animals, logos, and more. You can also load your own custom shapes or download them from online sources.
- To create a book cover or a magazine cover by using the Pen tool (P), you can select the Pen tool from the toolbar or press P on your keyboard. This will allow you to draw a path on your canvas by clicking and dragging. You can create any shape or curve you want with the Pen tool. You can also convert your path into a selection, a shape layer, or a vector mask.
- To create a book cover or a magazine cover by using the Brush tool (B), you can select the Brush tool from the toolbar or press B on your keyboard. This will allow you to paint on your canvas by clicking and dragging. You can choose any brush size, shape, hardness, opacity, flow, and mode you want. You can also use various brush presets such as calligraphic brushes, artistic brushes, natural brushes, special effect brushes, and more.
- Q: How do I center text for a book cover or a magazine cover in Photoshop?
A: You can center text for a book cover or a magazine cover in Photoshop by using any of the methods described above, such as using the Move tool, using guides and snapping, or using padding or line-height. These methods will center your text based on the bounding box of your text layer, which may vary depending on the size and shape of your document. You can also use the Align section on the Options bar to align your text with other elements on your canvas without affecting its document size.
How to center text for a business card or a letterhead in Photoshop
Q: What is a business card or a letterhead in Photoshop?
A: A business card or a letterhead is a type of design that is used to create and print a small card or a sheet of paper that contains the name, logo, contact information, and other details of a person, a company, or an organization in Photoshop. A business card is usually exchanged during formal or informal meetings or events as a way of introduction or promotion. A letterhead is usually used as the header or the footer of a letter or a document as a way of identification or branding.
Q: How do I create a business card or a letterhead in Photoshop?
A: You can create a business card or a letterhead in Photoshop by using various tools and techniques such as the New Document dialog box, the Text tool, the Shape tool, the Custom Shape tool, the Pen tool, the Brush tool, the Layer Style dialog box, the Filter menu, and more. Here are some examples:
- To create a business card or a letterhead by using the New Document dialog box, you can go to File > New or press Ctrl+N (Windows) or Command+N (Mac) on your keyboard. This will open the New Document dialog box where you can choose the preset size, resolution, color mode, and background color for your document. You can also enter your own custom values for these settings. You can choose from various presets such as Photo, Print, Art & Illustration, Web, Mobile, Film & Video, and more. You can also save your own presets and use them later.
- To create a business card or a letterhead by using the Text tool (T), you can select the Text tool from the toolbar or press T on your keyboard. This will allow you to write text on your canvas by clicking and typing. You can choose any font, size, color, and style you want. You can also use the Warp Text option on the Options bar to bend or distort your text into various shapes.
- To create a business card or a letterhead by using the Shape tool (U), you can select the Shape tool from the toolbar or press U on your keyboard. This will allow you to draw a shape on your canvas by clicking and dragging. You can choose from various shapes such as rectangles, rounded rectangles, ellipses, polygons, lines, custom shapes, and more. You can also adjust the fill color, stroke color, stroke width, stroke style, and other properties of your shape.
- To create a business card or a letterhead by using the Custom Shape tool (U), you can select the Custom Shape tool from the toolbar or press U on your keyboard. This will allow you to draw a custom shape on your canvas by clicking and dragging. You can choose from various custom shapes such as arrows, stars, hearts, flowers, animals, logos, and more. You can also load your own custom shapes or download them from online sources.
- To create a business card or a letterhead by using the Pen tool (P), you can select the Pen tool from the toolbar or press P on your keyboard. This will allow you to draw a path on your canvas by clicking and dragging. You can create any shape or curve you want with the Pen tool. You can also convert your path into a selection, a shape layer, or a vector mask.
- To create a business card or a letterhead by using the Brush tool (B), you can select the Brush tool from the toolbar or press B on your keyboard. This will allow you to paint on your canvas by clicking and dragging. You can choose any brush size, shape, hardness, opacity, flow, and mode you want. You can also use various brush presets such as calligraphic brushes, artistic brushes, natural brushes, special effect brushes, and more.
Q: How do I center text for a business card or a letterhead in Photoshop?
A: You can center text for a business card or a letterhead in Photoshop by using any of the methods described above, such as using the Move tool, using guides and snapping, or using padding or line-height. These methods will center your text based on the bounding box of your text layer, which may vary depending on the size and shape of your document. You can also use the Align section on the Options bar to align your text with other elements on your canvas without affecting its document size.
How to center text for a greeting card or an invitation card in Photoshop
Q: What is a greeting card or an invitation card in Photoshop?
A: A greeting card or an invitation card is a type of design that is used to create and print a folded or flat card that contains a message, an image, or both in Photoshop. A greeting card is usually sent or given to someone on a special occasion such as a birthday, an anniversary, a holiday, or a thank you. An invitation card is usually sent or given to someone to invite them to an event such as a wedding, a party, a meeting, or a conference.
Q: How do I create a greeting card or an invitation card in Photoshop?
A: You can create a greeting card or an invitation card in Photoshop by using various tools and techniques such as the New Document dialog box, the Text tool, the Shape tool, the Custom Shape tool, the Pen tool, the Brush tool, the Layer Style dialog box, the Filter menu, and more. Here are some examples:
- To create a greeting card or an invitation card by using the New Document dialog box, you can go to File > New or press Ctrl+N (Windows) or Command+N (Mac) on your keyboard. This will open the New Document dialog box where you can choose the preset size, resolution, color mode, and background color for your document. You can also enter your own custom values for these settings. You can choose from various presets such as Photo, Print, Art & Illustration, Web, Mobile, Film & Video, and more. You can also save your own presets and use them later.
- To create a greeting card or an invitation card by using the Text tool (T), you can select the Text tool from the toolbar or press T on your keyboard. This will allow you to write text on your canvas by clicking and typing. You can choose any font, size, color, and style you want. You can also use the Warp Text option on the Options bar to bend or distort your text into various shapes.
- To create a greeting card or an invitation card by using the Shape tool (U), you can select the Shape tool from the toolbar or press U on your keyboard. This will allow you to draw a shape on your canvas by clicking and dragging. You can choose from various shapes such as rectangles, rounded rectangles, ellipses, polygons, lines, custom shapes, and more. You can also adjust the fill color, stroke color, stroke width, stroke style, and other properties of your shape.
- To create a greeting card or an invitation card by using the Custom Shape tool (U), you can select the Custom Shape tool from the toolbar or press U on your keyboard. This will allow you to draw a custom shape on your canvas by clicking and dragging. You can choose from various custom shapes such as arrows, stars, hearts, flowers, animals, logos, and more. You can also load your own custom shapes or download them from online sources.
- To create a greeting card or an invitation card by using the Pen tool (P), you can select the Pen tool from the toolbar or press P on your keyboard. This will allow you to draw a path on your canvas by clicking and dragging. You can create any shape or curve you want with the Pen tool. You can also convert your path into a selection, a shape layer, or a vector mask.
- To create a greeting card or an invitation card by using the Brush tool (B), you can select the Brush tool from the toolbar or press B on your keyboard. This will allow you to paint on your canvas by clicking and dragging. You can choose any brush size, shape, hardness, opacity, flow, and mode you want. You can also use various brush presets such as calligraphic brushes, artistic brushes, natural brushes, special effect brushes, and more.
Q: How do I center text for a greeting card or an invitation card in Photoshop?
A: You can center text for a greeting card or an invitation card in Photoshop by using any of the methods described above, such as using the Move tool, using guides and snapping, or using padding or line-height. These methods will center your text based on the bounding box of your text layer, which may vary depending on the size and shape of your document. You can also use the Align section on the Options bar to align your text with other elements on your canvas without affecting its document size.
How to center text for a t-shirt or a mug design in Photoshop
Q: What is a t-shirt or a mug design in Photoshop?
A: A t-shirt or a mug design is a type of design that is used to create and print a graphic, a text, or both on a t-shirt or a mug in Photoshop. A t-shirt or a mug design usually contains a message, an image, or both that express something personal, funny, inspirational, or promotional.
Q: How do I create a t-shirt or a mug design in Photoshop?
A: You can create a t-shirt or a mug design in Photoshop by using various tools and techniques such as the New Document dialog box, the Text tool, the Shape tool, the Custom Shape tool, the Pen tool, the Brush tool, the Layer Style dialog box, the Filter menu, and more. Here are some examples:
- To create a t-shirt or a mug design by using the New Document dialog box, you can go to File > New or press Ctrl+N (Windows) or Command+N (Mac) on your keyboard. This will open the New Document dialog box where you can choose the preset size, resolution, color mode, and background color for your document. You can also enter your own custom values for these settings. You can choose from various presets such as Photo, Print, Art & Illustration, Web, Mobile, Film & Video, and more. You can also save your own presets and use them later.
- To create a t-shirt or a mug design by using the Text tool (T), you can select the Text tool from the toolbar or press T on your keyboard. This will allow you to write text on your canvas by clicking and typing. You can choose any font, size, color, and style you want. You can also use the Warp Text option on the Options bar to bend or distort your text into various shapes.
- To create a t-shirt or a mug design by using the Shape tool (U), you can select the Shape tool from the toolbar or press U on your keyboard. This will allow you to draw a shape on your canvas by clicking and dragging. You can choose from various shapes such as rectangles, rounded rectangles, ellipses, polygons, lines, custom shapes, and more. You can also adjust the fill color, stroke color, stroke width, stroke style, and other properties of your shape.
- To create a t-shirt or a mug design by using the Custom Shape tool (U), you can select the Custom Shape tool from the toolbar or press U on your keyboard. This will allow you to draw a custom shape on your canvas by clicking and dragging. You can choose from various custom shapes such as arrows, stars, hearts, flowers, animals, logos, and more. You can also load your own custom shapes or download them from online sources.
- To create a t-shirt or a mug design by using the Pen tool (P), you can select the Pen tool from the toolbar or press P on your keyboard. This will allow you to draw a path on your canvas by clicking and dragging. You can create any shape or curve you want with the Pen tool. You can also convert your path into a selection, a shape layer, or a vector mask.
- To create a t-shirt or a mug design by using the Brush tool (B), you can select the Brush tool from the toolbar or press B on your keyboard. This will allow you to paint on your canvas by clicking and dragging. You can choose any brush size, shape, hardness, opacity, flow, and mode you want. You can also use various brush presets such as calligraphic brushes, artistic brushes, natural brushes, special effect brushes, and more.
Q: How do I center text for a t-shirt or a mug design in Photoshop?
A: You can center text for a t-shirt or a mug design in Photoshop by using any of the methods described above, such as using the Move tool, using guides and snapping, or using padding or line-height. These methods will center your text based on the bounding box of your text layer, which may vary depending on the size and shape of your document. You can also use the Align section on the Options bar to align your text with other elements on your canvas without affecting its document size.
How to center text for a sticker or a label in Photoshop
Q: What is a sticker or a label in Photoshop?
A: A sticker or a label is a type of design that is used to create and print a small piece of paper, plastic, or metal that contains a message, an image, or both in Photoshop. A sticker or a label is usually attached to an object, a product, a package, or a surface to provide information, identification, decoration, or promotion.
Q: How do I create a sticker or a label in Photoshop?
A: You can create a sticker or a label in Photoshop by using various tools and techniques such as the New Document dialog box, the Text tool, the Shape tool, the Custom Shape tool, the Pen tool, the Brush tool, the Layer Style dialog box, the Filter menu, and more. Here are some examples:
- To create a sticker or a label by using the New Document dialog box, you can go to File > New or press Ctrl+N (Windows) or Command+N (Mac) on your keyboard. This will open the New Document dialog box where you can choose the preset size, resolution, color mode, and background color for your document. You can also enter your own custom values for these settings. You can choose from various presets such as Photo, Print, Art & Illustration, Web, Mobile, Film & Video, and more. You can also save your own presets and use them later.
- To create a sticker or a label by using the Text tool (T), you can select the Text tool from the toolbar or press T on your keyboard. This will allow you to write text on your canvas by clicking and typing. You can choose any font, size, color, and style you want. You can also use the Warp Text option on the Options bar to bend or distort your text into various shapes.
- To create a sticker or a label by using the Shape tool (U), you can select the Shape tool from the toolbar or press U on your keyboard. This will allow you to draw a shape on your canvas by clicking and dragging. You can choose from various shapes such as rectangles, rounded rectangles, ellipses, polygons, lines, custom shapes, and more. You can also adjust the fill color, stroke color, stroke width, stroke style, and other properties of your shape.
- To create a sticker or a label by using the Custom Shape tool (U), you can select the Custom Shape tool from the toolbar or press U on your keyboard. This will allow you to draw a custom shape on your canvas by clicking and dragging. You can choose from various custom shapes such as arrows, stars, hearts, flowers, animals, logos, and more. You can also load your own custom shapes or download them from online sources.
- To create a sticker or a label by using the Pen tool (P), you can select the Pen tool from the toolbar or press P on your keyboard. This will allow you to draw a path on your canvas by clicking and dragging. You can create any shape or curve you want with the Pen tool. You can also convert your path into a selection, a shape layer, or a vector mask.
- To create a sticker or a label by using the Brush tool (B), you can select the Brush tool from the toolbar or press B on your keyboard. This will allow you to paint on your canvas by clicking and dragging. You can choose any brush size, shape, hardness, opacity, flow, and mode you want. You can also use various brush presets such as calligraphic brushes, artistic brushes, natural brushes, special effect brushes, and more.
Q: How do I center text for a sticker or a label in Photoshop?
A: You can center text for a sticker or a label in Photoshop by using any of the methods described above, such as using the Move tool, using guides and snapping, or using padding or line-height. These methods will center your text based on the bounding box of your text layer, which may vary depending on the size and shape of your document. You can also use the Align section on the Options bar to align your text with other elements on your canvas without affecting its document size.